
Resource Management
05: Textures
Version 1.0, Updated April 2023 using Octane 2022.1 and C4D 2023.1.3
About This Guide
This is part of an ongoing series on the exciting world of resource management!
The goal of this series is to explore what C4D and Octane are doing under the hood, and how to tune our system resources and habits to make our workflow as zen and frustration-free as possible. Part 01 is an overview of how the whole system works. Part 02 is a rollup of all the findings of the rest of the series. This guide is a deep dive into a particular area of interest - namely textures.
Guides in this series
· 01: Overview
· 02: Findings Summary
· 03: Polygons
· 04: Instances
· 05: Textures <--This one
PDF
I. Intro
Textures have the potential to be the largest VRAM hogs in our scenes. They’re also one of the least understood and most confusing components of resource management, mostly because it seems like it should be so straightforward. In this guide we’ll explore some basic and intermediate concepts about textures and how Octane treats them.
Testing system
We’ll be using a 2021 Razer Blade 15 for these guides. Specs: i9-11900H CPU/64GB RAM/RTX3080 Laptop GPU/16GB VRAM/4K 60Hz OLED. OS: Win 11 Home 22H2. Cinema 4D 2023.1/Octane Render 2022.1
Test scenes are 1280x1280, 30FPS. All unnecessary apps and processes have been shut down.
The Gold Standard

II. Texture Basics
This part of the guide is a refresher on terms and concepts used when talking about image files. Feel free to skip to Part III if this is old hat, and you’re just interested in how Octane handles textures.
Glossary/Jargon
A texture in the larger 3D world is most commonly an external image file like a PNG, EXR, TIFF, etc.
A shader is a small bit of code that generates or manipulates visual and/or utility data which is then passed off to a material. Shaders can either use textures as inputs or generate their own data.
A material channel is a subdivision of a material that applies a shader to a particular aspect of that material (roughness, metallic, albedo, etc).
A material is a collection of material channels bundled into one neat package that’s applied to geometry object.
Note: Octane Render doesn’t really use the term “shader” for the most part. It simplifies the stack so that anything that plugs into a material channel is referred to as a texture, even though to the rest of the 3D world, these would all be shaders. We’re still going to refer to the ImageTexure node/texture/shader in this guide as a shader.
Image file-related terms
Image Format: This is the file type of the external texture that’s stored in on disk. The most common ones we’re dealing with here are JPG (JPEG), PNG, EXR (OpenEXR), and to some extent TIF (TIFF) or Targa (TGA). Different formats were developed for particular reasons, and therefore support different amounts of channels, compression methods, and other attributes.
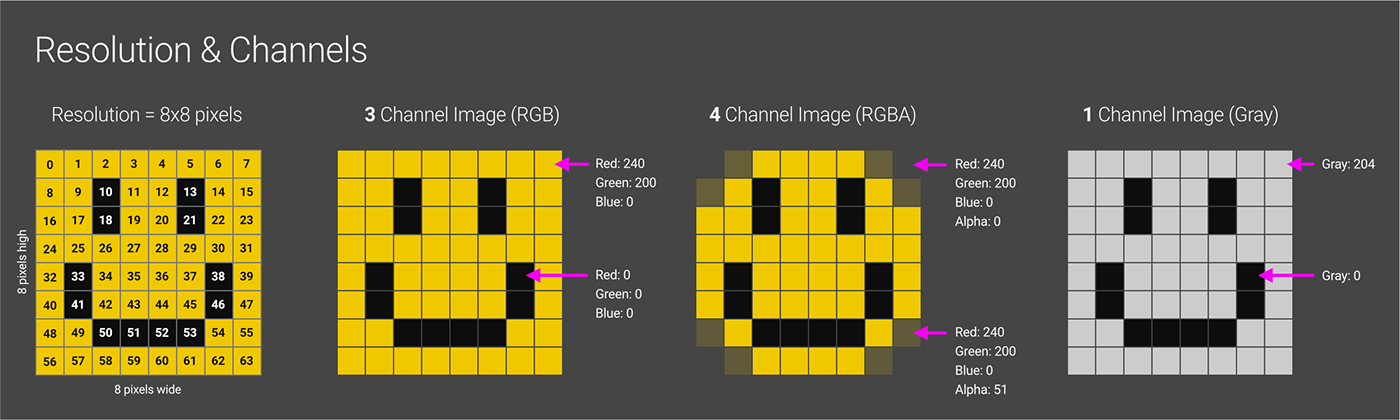
Resolution: The number of pixels wide by the number tall. Image files that are typically meant for textures have resolutions in powers of two (2, 4, 8, 16, 32...) in a 1:1 aspect ratio. What’s commonly referred to as a “4K texture” is usually 4096x4096 pixels. “2k” would be 2048x2048, etc. HDRI files are usually in powers of two, but in a 2:1 aspect ratio. A 4K HDRI is 4096x2048, and an 8K HDRI is 8192x4096.
Image Channel: Like materials, image files themselves also have multiple channels to store color and other data. An RGB image has three color channels: R (red), G (green) and B (blue). RGBA has four: R, G and B like the RGB image, but also A - the alpha channel that determines transparency. Pretty much all file formats allow for three (RGB) color channel data. PNG and EXR natively allow for four channels (RGBA).
Nearly all file formats can also be saved as single-channel (grayscale) images. This can cut down on the file size significantly. Grayscale textures are mostly used as utility textures for material channels like Roughness and Bump that ignore color data anyway.
Bit Depth: Essentially, this is how accurate the data in the file is. Higher bit depth images allow for more colors or shades of gray which are useful in non-color data material channels like bump/normal/displacement, but all that extra data means larger file sizes and more VRAM used.
This concept can get confusing because of how how the numbers are referred to in different apps. When we see an image referred to as “8-bit”, “16-bit” or “32-bit”, this usually means the number of bits per channel (BPC). BPC gets multiplied by the number of channels to give us the bits per pixel (BPP).
Most image editors like Photoshop work in bits per channel, so we’ll see an 8-bit, 16-bit, or 32-bit image here. Octane and many other render engines work in bits per pixel, so we’ll see values like 24-bit (three channels * 8 bits per channel) or 96-bit (three channels * 32 bits per channel).

Compression: Many image formats have some sort of compression algorithm that’s applied when the image is saved so that disk space and bandwidth is used more efficiently. There are two main buckets for compression - Lossless and Lossy, and then several methods (or algorithms) for each type.
Lossless compression analyzes all the pixels and uses an algorithm to store a smaller version of the file that can be reconstructed when a system needs to display it. These calculations can be slow, but it also means no data is lost when the image is reconstructed. In the example above, the type of lossless compression is RLE (Run Length Encoding). This was chosen because it’s the easiest to understand and show visually. Most other lossless algos are far more complicated (and better). Lossless compression is best for utility textures where having the highest quality uncompressed version makes a difference. It can also be better for visual images that are very graphic and sharp, and don’t have much grain to them.
Lossy compression looks at an image and decides which data to throw out forever because it feels confident it can estimate what should be there when it needs to recreate the full image for display later. Sometimes it’s right and it’s not noticeable to the eye, sometimes it’s not and we get grain and artifacts. This type of compression works great on photographs and noisy/grainy images since the artifacts and grain the algo generates can be hidden by all that complexity. It’s terrible for estimating sharp edges, large fields of the same color, and clear boundaries needed for utility maps or very graphic patterns.
Avoid lossy compression for displacement.
Some file formats like JPEG only support lossy compression. Others like PNG are only lossless. EXR has a few options, some of which are lossy (DWAA/DWAB), and some are lossless (RLE/ZIP/PIZ). BCn compression (which we’ll explore toward the end of this guide) is lossy, but does a pretty good job of keeping image fidelity and fine for any maps other than displacement most of the time.
Image Texture Usage
Visual Component of Materials

The most obvious use for image textures is to add visual detail to our objects to make them look either more photorealistic or give them an interesting graphic pattern. These get fed into the material’s Albedo or Diffuse channel. In almost all cases, a low-to-medium resolution (1k for a tileable or far-away pattern, up to maybe 8k for closeups) 8-bit image will do the job here. Compression can be lossy or lossless and not matter most of the time. In nearly all cases, going more than 8K or 8-bit for a visual texture would be overkill and waste VRAM.
Utility Textures in Materials
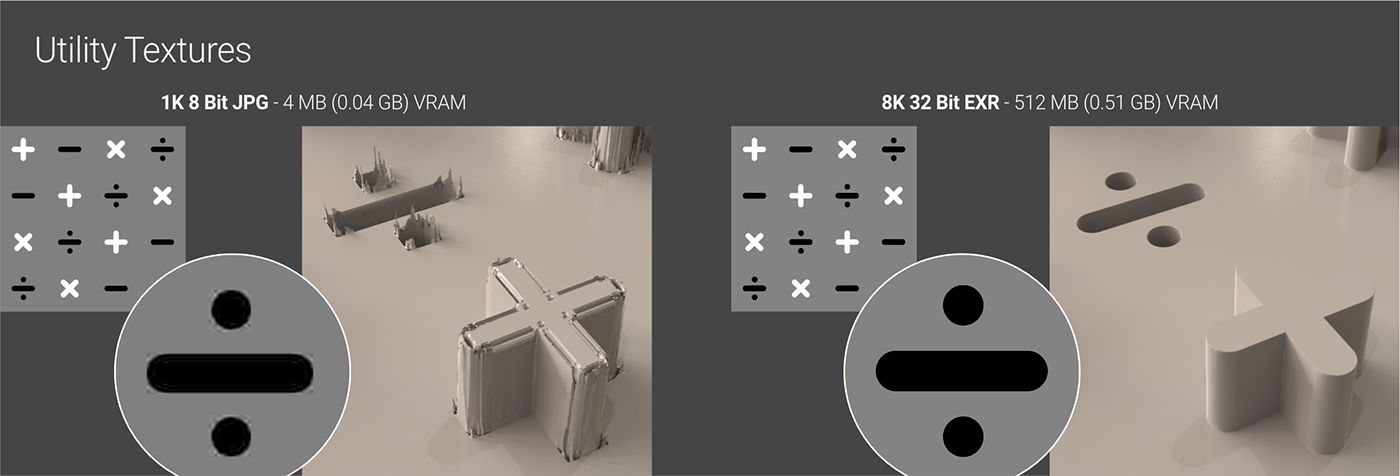
For all channels in a material aside from Albedo (or Diffuse in older materials), textures are used as data maps to tell Octane how much weight to give to a particular area of the model in that channel. The bit depth and compression type (lossy/lossless) of these maps can matter quite a bit, especially in the Displacement channel. In the example above, the 1K 8 bit JPEG would probably be fine in the Albedo channel as long as the camera didn’t get too close, but it’s just appalling when used as a Displacement map. On the other hand, the 8K 32-bit lossless image on the right would be overkill in the Albedo channel, but it’s needed for a super smooth Displacement map. Other material channels like Bump, Normal, and Roughness have their own tolerances. Most utility textures are grayscale because the material channel only makes use of a single float (0-1) value to determine how rough, high, or metallic a portion of the model is.
Lighting via HDRIs
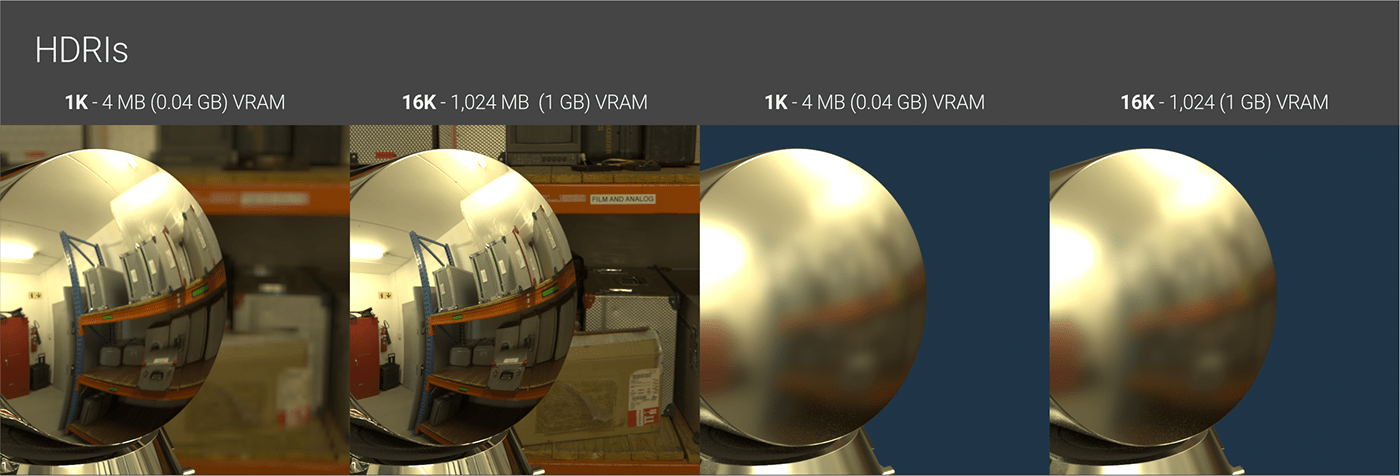
The place a lot of us go crazy with heavy image texture files is when dropping an HDRI into scene. It’s very easy to come across 16K and even 24K HDRIs now, but these files can get enormous and have a large impact on our performance and VRAM usage. Most of the time a 4K will suffice, and a 2K or even 1K will be more than adequate if it’s just quick lighting and abstract reflections we’re after and we’re not using it as a background. In the two examples on the right above, there’s virtually no visual difference between the 1K and 16K version, but the 16K is using a gig of VRAM where the 1K is only using a few megs, so that reduces the amount of other stuff we can have in our scene considerably with no visual advantage.
We need to consider the higher res versions of an HDRI when the output resolution of our renders are fairly high (say we’re exporting 4k or 8k frames), and we have very high gloss (low roughness materials) that we want sharp reflections in. We’ll also need to go higher if we intend to use the HDRI as a backdrop for the scene. The left two panels of the illustration above make this pretty clear.
The Texture Manager & Device Settings

The Texture Manager is found in the Live Viewer’s Materials menu. It can be unstable (especially when materials are being worked on or deleted) and is only accurate with VRAM estimates when we’re using 8- or 16-bit RGB uncompressed images, or 32-bit gray uncompressed images. It’s useful for figuring out where textures are located and quickly changing ImageTexture options without having to dive into each material.
The Device Settings window is found in Octane Settings>Settings tab. This gives a very accurate account of how much VRAM a scene used after the render is complete.
Part III: How Octane Processes External Images
We might think this is the easy part of our resource management journey. Let’s say we have a handful of textures in a folder that total 600 KB that we dump in our scene and hook up to a material, so Octane should use about 600 KB of VRAM during our render, right?
Nope.
Maybe it’ll use 600 KB, maybe it’ll use 600 MB, maybe it’ll use 6,000 MB. It depends on a few key things.
Weird as it sounds, Octane pretty much ignores the file format and size on disk of the textures loaded in when determining VRAM usage. The saving grace in all this is that once we understand how this works, it actually becomes quite easy to predict how many images we can have in our scene, but it takes some work to get our heads around it all. Strap in folks, it’s going to get nerdy up in here.
Overview
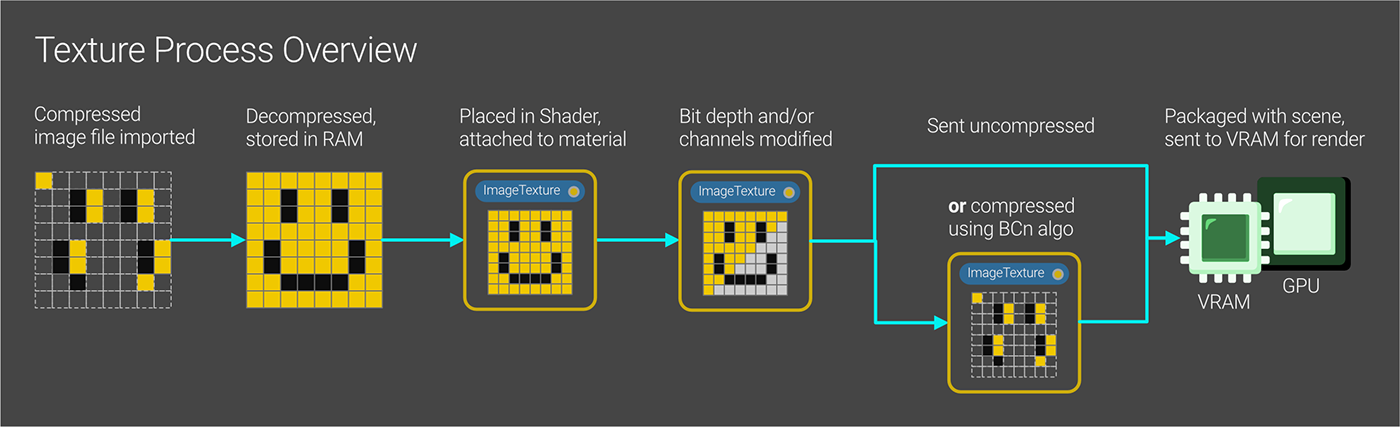
In a nutshell, Octane imports and decompresses an external image file, and stores it in RAM. This image is contained in a shader (ideally an Octane ImageTexture shader). The ImageTexture shader has options to modify the bit depth and number of channels used. It also gives us the option to compress and cache a smaller version of the image if desired. When a render is initiated, the texture data is sent to VRAM along with the geometry and other scene stuff to be used by the GPU to produce the final render.
Import/Decompression
The first Very Important Thing™ to know here is that in nearly all cases (we’ll revisit this “nearly” thing later), Octane needs images to be in a decompressed state in memory in order to be able to work with them. PNGs, JPGs, EXRs, TIFs, TGAs, and pretty much every other file type Octane supports are always decompressed when imported.
This means the RAM/VRAM it consumes can get pretty massive, even if the image file is small.
As an example, If we have an 8k (8192x8192) 8-bit RGB PNG, it might be about two or three megabytes on disk. The same image when saved as JPEG may be under a megabyte. The same image again when saved an EXR might be five or twenty megabytes depending on the compression chosen. When imported into Octane, any of these will use 256 MB of VRAM due to being decompressed. A 16-bit version would be half a gig, and a 32-bit version would take an entire gig.
If we can’t trust the file size, and we can't trust the Texture Manager half the time, how do we know how large these will be?
VRAM Allocation
This next part is probably the biggest cause of confusion in this whole process. We can only trust the Texture Manager to give us accurate estimates for 8- and 16-bit RGB 1:1 square textures, 32-bit 2:1 HDRI images, and 32-bit 1:1 grayscale textures. The estimates are squirrely with any other combo of size and bit depth.
Below is a table that shows common texture sizes and the actual VRAM in Megabytes used, assuming no BCn compression is used (more on this later).
For the grayscale columns, this assumes that the Type was set to Float in the ImageTexture node. If it’s set to Normal, the corresponding RGBA values will be used instead (more on this later as well).
Numbers in green line up with the Texture Manager’s estimates.

The Math
When we take compression out of the mix, figuring out how much space on disk (not in VRAM) an uncompressed image takes up is actually pretty easy. The formula goes like this:
(Width * Height * # of Channels * bit depth) / 8,388,608 = megabytes on disk
The number of pixels (width * height), times the number of channels, times the bits per channel gets us the total number of bits. Dividing that by 8,388,608 (8 bits in a byte times 1,048,567 bytes in a megabyte) gets us the total number of megabytes.
Octane does not differentiate between 3-channel and 4-channel color images. The number of megs needed in VRAM is based on four channels. So Octane’s formula for an uncompressed RGB or RGBA image looks like this:
(Width * Height * 4 * bit depth) / 8,388,608 = megabytes in VRAM
Octane also recognizes single-channel grayscale data if the ImageTexture node is set up properly. This takes up a quarter of memory since it’s only using one channel instead of four. That formula looks like this:
(Width * Height * bit depth) / 8,388,608 = megabytes in VRAM
All this mathy stuff is further broken down in the Appendix section at the end.
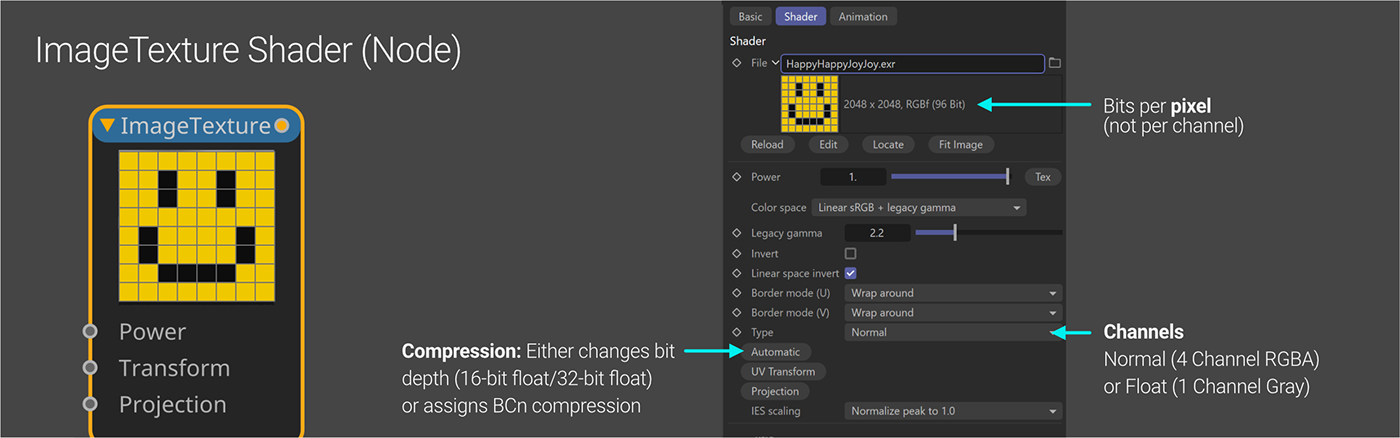
ImageTexture Shader
In the ImageTexture node, we have the ability to reduce the bit depth and number of channels of any image, regardless of its native properties.
The next Very Important Thing™ to know is that we need to properly set the values here if our scenes have more than just a smattering of external image textures so we don’t run ourselves out of VRAM.
Let’s start with the Type dropdown.
The default is Normal, which means four-channel RGBA. If the image imported into Octane is RGB or RGBA, then great - this is where it should be. As mentioned before, it doesn’t matter if the image is three or four channel, Octane will use four channel’s worth of VRAM regardless. If the image is grayscale, however, this can be a problem. Octane will convert the 1-channel gray image to a four-channel RGBA, effectively quadrupling the VRAM the image needs during render.
With scenes where low-res and/or not many textures are used, this can fly under the radar since most modern GPUs have a pretty considerable amount of VRAM. This really becomes an issue when several 8K texture sets are imported, and all the bump, roughness, metallic, etc. textures for each material are now taking a quarter of a gig apiece when they really should only be in the 64MB realm. Eventually this runs us into out-of-core memory and we start complaining about the render being slow and unstable without knowing why. To fix this, we need the next option.
Float means one-channel Gray. All grayscale images should be set to this to conserve VRAM. Another good use for this is if we have a very large, high-res HDRI, and find ourselves not needing the color data. We can quarter the VRAM by setting this to Float, and now we just have a grayscale environment light.
The last option is Alpha, which is for extracting alpha channel data from an image type that supports that. Not really relevant in this guide.
The Compression button (the one that says Automatic by default under the Type dropdown) is its own beast that we’ll dive into further in the Compression section. For now though, let’s ignore the BC6 option and know that we can take any 32-bit texture and cut it down to 16-bit, which will halve the VRAM usage. This will degrade the quality some, which may or may not be noticeable depending on the channel. Odds are good if we’re given a 32-bit gray image to use in Roughness, Metallic, or one of the other more visual channels, we won’t notice a difference if we cut this to 16-bit. We might with extremely subtle Bump and Normal textures, and if we’re pretty close in, we probably will with Displacement, which is the most finicky of the channels when it comes to bit depth.
We can also take any 16-bit texture and increase it to 32-bit, which will double the VRAM usage. Probably best to not do this.

BCn Compression
Remember that “nearly all cases” line from wayyyyy back in the Import/Decompression section? Well, here’s why that was there:
For PNG, JPG, TIF, GIF, EXR, TGA, PSD, & BMP - using any of their native compression algorithms - Octane will have to decompress the image before it can do anything with it. By default, it’s those decompressed versions of the textures that are stored in RAM and sent to the VRAM for rendering. That’s why they’re all so huge.
Octane does support texture compression though, but in a very specific way. It uses a set of lossy GPU-optimized algorithms called “Block Compression”, or BCn. The “n” just refers to a number, so there’s currently BC1, BC2, BC3... up to BC7. Newer iterations of the algorithm are given new numbers as they come out. The different algorithms target different types of images, so it’s not just a case of newer ones being better.
Octane can either compress images using one of these BCn algorithms on the CPU and store the compressed version in a cache on the local drive, or it can import a .DDS image file (DirectDraw Surface) that’s already compressed using BCn and use it in its compressed state. Both of these methods have their pros and cons.
Compressing and Caching using Octane
This is all done using the Compression button in the ImageTexture shader. It defaults to “Automatic”, but depending on the makeup of the imported image, some or no options are available.
8-bit RGB images: BC1, BC3, or BC7.
BC1 gives the best compression ratio (8:1) but loses the most data. Use this if VRAM is perilously low.
BC3 has a 4:1 compression ratio, and is reasonably fast. The quality is better than BC1, but not as good as BC7.
BC7 also has a 4:1 compression ratio and the best quality of the lot, but can be slow.
16- or 32-bit RGB or Gray images: BC6 is the only option (other than changing bit depth, but that’s not related to BCn compression). It has an 8:1 compression ratio, but can be very slow depending on the texture size.
note 1: BC6 only supports up to 16-bit, so this process converts 32-bit images to 16-bit, which will make it appear to have a much better compression ratio than it really does.
note 2: Gray 16- or 32-bit images are treated as RGBA when using BC6 compression, so changing these from Normal to Float won’t result in any difference in the VRAM usage. The compression will still save more VRAM than the channel conversion in most cases by 2x.
note 3: BC6 does a great job at keeping image fidelity, but it’s still lossy at the end of the day, so be careful about using these for displacement maps (try really hard not to).
8-bit Gray images: No options, but if it’s set to Type: Float, it’s going to be really small anyway.
When any of the BCn options (BC1, BC3, BC6, or BC7) are chosen, Octane creates and stores a compressed version of the image in the cache located here:
C:\Users\<<yourusername>>\AppData\Local\OctaneRender\cache\
A texCache\imageTex\ folder will appear once an image is cached and be deleted when the cache is cleared.
...And now, the bad news
Important: While this type of compression is super efficient on a GPU, it can be absolutely brutal on the CPU which is where the compression happens after one of the BCn algos are chosen. Depending on the size and bit depth, it could actually spike the CPU usage to 100% for several minutes while it works through it.
If a scene has 20 high-res, high bit depth images compressed to BC6 across all the active materials, and the cache was cleared, it could bog the computer down for a very long time while it rebuilds and caches all the images.
The best way to approach this is:
0. Make a copy of the scene so you have an uncompressed version
1. Import a texture into an ImageTexture shader
2. Hook it up to a material channel
3. Launch the Task Manager (ctl-shift-esc)
4. Open an explorer window and navigate to C:\Users\<<yourusername>>\AppData\Local\OctaneRender\cache\ .There may or may not be a \texCache\imageTex\ folder there depending on whether we’ve cached anything else.
5. Back in C4D, set the compression to one of the BCn algos using the button that defaults to Automatic
6. Do. Not. Touch. C4D. !!. Watch the CPU usage in the Task Manager. It should spike for some time (especially if it’s a 4k or 8k 16- or 32-bit texture and using BC6 or BC7). Once the CPU is back to a few percent and the fans go back to normal, a new entry in texCache\imageTex\ should appear. At this point, we know it’s well and truly cached, and can move to the next texture.
If we start clicking around and mashing buttons during this process, it could cause C4D (or our computer) to crash or lock up. If we try to compress a few high resolution textures (or a lot lower resolution textures) at once, it’ll probably crash.
Going External with .DDS files
If caching becomes an issue (for instance, if we need to work on the same file on multiple machines), or we need compressed textures for our 300-material Archviz city, we can actually still take advantage of BCn textures without all this need for caching by using the DirectDraw Surface, or .DDS file format which supports BCn directly, and is recognized by Octane.
The advantage to this is that the DDS files will load in quickly and not need to be decompressed or cached, saving our poor CPU from any further indignities. We’ll still get all the VRAM-saving advantages using this file type.
The drawback? Well, we need to know which BCn algo to use for each type of image, and then actually convert our images to DDS using an external tool of some sort, which isn’t super standard except in game-development circles. Also, if we find out that we overcompressed an image, we need to go back and re-export it using a different compression. In other words, there’s a bit of a learning curve, and for many scenes and hardware configs it’s overkill. For this reason, it’s probably best if we just optimize our images using one of the other methods (seek out lower res/bit depth versions and convert to Float for utility textures) before going down this path.
NVIDIA makes a free standalone exporter and Photoshop plugin (free account required). Intel also has a free Photoshop plugin (no account required). AMD also has a standalone tool (free, open source). Some quick tests with the AMD tool yielded favorable results. Twenty 8K 8- and 16-bit BC6 and BC7 DDS images were placed in a material with no hit in speed or caching issues, and they only used a total of 360 megs rather than a few gigs.
Where does all this leave us then?
It all comes down to cost/benefit.
How much are the textures impacting our performance for this project, how much time do we want to spend up front optimizing, and what’s the payoff?
The things we can do on every project that uses external textures are:
1. See if we can get away with a procedural texture set instead of an image.
2. Seek out and load in the lowest resolution/bit depth versions of textures we can get away with.
3. Always use the ImageTexture shader for bitmaps instead of C4D’s native bitmap shader.
4. Set any grayscale texture to Type: Float in the ImageTexture Shader.
5. Remove any extra textures from the project after we’re done auditioning them.
If we’re still tight on VRAM,
1. See if reducing any 32-bit images to 16-bit in the Image Compression button (default: Automatic) works without a hit to the quality
2. If there aren’t a lot of textures, but they’re eating up a lot of VRAM, use the Compression button to compress and cache images using a BCn algorithm. For 32-bit/16-bit images, this is BC6. For 8-bit images, we can try BC7, BC3, and as a last resort, BC1. If we’re going to do this, we need to do it one at a time and wait until one is finished before converting another. This process will take time and patience.
3. If we’re working on a project that uses a ton of high res textures, or if we’re working across multiple machines and don’t want to keep caching, we can look into converting them outside of Octane to DDS format using an appropriate DCn compression.
Wrap Up/Further Reading
This guide hopefully gave you a very good understanding of how external image textures work in Cinema 4D/Octane and cleared up any confusion that's pretty standard-issue with this topic.
Nathan Reed has an excellent breakdown of what BCn compression is if you want a deeper dive into these compression algos.
AMD Compressonator is a good free, open source tool for converting images to .DDS format using BCn compression.
NVIDIA also has tools for this (account required), and Intel has a Photoshop plugin.
Appendix/Show Your Work
Calculating the size on disk of an uncompressed image
(Width * Height * # of Channels * bit depth) / 8,388,608 = megabytes on disk
Broken down:
(Width * Height) gets us the total pixels
# of Channels: Gray is 1 channel, Gray with Alpha is 2, RGB is 3, RGB with Alpha is 4
The bit depth specified in the file is the bits per channel
(# of Channels * bit depth) gets us the bits per pixel (BPP)
(Total pixels * BPP) gets us the total bits
8,388,608 = 8 bits in a byte * 1,048,567 bytes in a megabyte
(Total bits / 8,388,608) gets us the total megabytes.
Example
For an 8K (8192x8192) 8-bit RGB image:
8192*8192 = 67,108,864 total pixels
RGB = 3 Channels, 8 bits per channel (BPC)
3 Channels * 8 BPC = 24 bits per pixel (BPP)
67,108,864 * 24 BPP = 1,610,612,736 total bits
1,610,612,736 total bits / 8,388,608 bits in a megabyte = 192 megabytes on disk (but not in VRAM).
Octane VRAM Usage Formulas
For RGB or RGBA images, Octane always assumes four channels, so the formula goes like this:
(Width * Height * BPC * 4) / 8,388,608 = megabytes in VRAM
For Grayscale images, if the Type is set to Float in the ImageTexture shader, Octane assumes one channel:
(Width * Height * BPC) / 8,388,608 = megabytes in VRAM
Author Notes
OG032 Resource Management: Textures, version 1.0, Last modified April 2023.
This guide originally appeared on https://be.net/scottbenson and https://help.otoy.com/hc/en-us/articles/212549326-OctaneRender-for-CINEMA-4D-Cheatsheet
All rights reserved.
The written guide may be distributed freely and can be used for personal or professional training, but not modified or sold. The assets distributed within this guide are either generated specifically for this guide and released as cc0, or sourced from cc0 sites, so they may be used for any reason, personal or commercial. The emoji font used here is


